Why change sight pins?
If you are thinking of trying a new sight pin on your recurve bow it might be worth looking at the Beiter sight tunnel. I decided to give it a try when I found my Decut Tawant scope (which I love) was outside in certain conditions (sunny!) it showed me a reflection of myself in the lens. This was very off putting, but also you have to be careful in the rain (like any compound archer). When it rains the scope can fill up with water with the lens in place. I usually carry a small plastic bag or just put my hat over my bow if it’s raining and it’s on its bow stand. So because of all these reasons I decided to try something else for outdoor shooting.
The Beiter sight tunnel comes in both an 8mm and 12mm size using a standard 8/32, 10/32 thread for the 12mm and a choice of M4 or 8/32 threads for the 8mm version. You can choose between black and clear versions.
This is quite a cheap scope and it is very versatile as there are lots of different inserts and fluorescent pins available. You can even purchase a bubble level that slides onto the bottom, so you can check you are not canting the bow (for practice use only, not allowed in competitions).
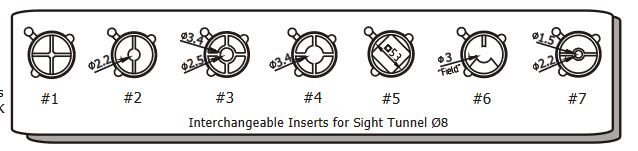
8mm Inserts
12mm Inserts

Beiter Sight Tunnel Pricing
I can see why this Beiter sight tunnel has been around so long and is so popular. The initial kit is about £10 where you get the scope housing and two inserts to try. Extra inserts are also very cheap at around £1-2 each. The fluorescent pins of which there are two sizes 1.5mm and 2.5mm cost about £1-2 each. The bubble level is about £7-8. Beiter also make a circle insert 5 pack for about £6-7.
As it’s so cheap to buy inserts it’s worth buying a few different ones and finding out which suits you best. Plus the great thing about this, is that if you lose or break a part they are easy and cheap to replace.
Beiter Sight Tunnel Fluorescent Pins
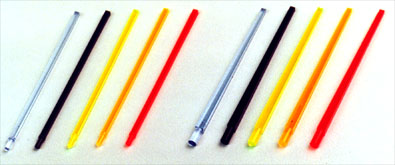
The various coloured pins (green, orange) come at a length of around 5cm long. There are two sizes, a 1.5mm and 2.5mm. Only certain sizes fit certain inserts, so check the chart for compatibility. But they will fit number #3 and #7 on the 8mm version and numbers #13, #17, #18 and #19 on the 12mm sight tunnel.
They do seem quite long and you do need to remove the pin first before you can remove the insert. But you will need to remember that WRS shoot rules only allow a fibre type pin to come out by 2cm from the scope. So you will need to cut these down if you are entering a WRS shoot. They are not bendy like the Shibuya fibre optic which loops sideways but these pins are rigid.
What I found when using them outside is that when shooting at various distances it means your bow changes angles and sometimes you can not only see the pin in the sight window but also the full length of the pin, which is quite off putting. So cutting it down does seem a good idea. But the more length you remove the dimmer the actual pin will become.
Beiter Circular Apeture Inserts
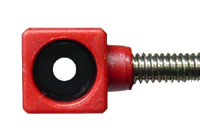 A lot of people don’t shoot using a pin, but prefer an open ring so they just frame the target instead of trying to aim precisely at the centre of the target. For those people Beiter produce a 5 pack of various apetures for the 12mm sight tunnel and a 4 pack for the 8mm sight tunnel.
The 12mm pack includes 3mm, 4.5mm, 6mm, 7.5mm & 9mm
The 8mm pack includes 3mm, 4mm, 5mm, & 6mm
There are also different colours in these inserts, you can choose from black, clear and red. I chose black to go with my black tunnel.
The great thing is you can try them all out and see which you prefer. It does take a bit of getting used to shooting an open ring if you are used to a dot. You could also use different apertures for indoor and outdoor shooting.
So what Beiter sight tunnel inserts have I tried?
I started trying the insert #11 (red) on the 12mm, which is the red crosshairs. I did not get on very well with this as both the horizontal and vertical lines are the same thickness and I prefer a dot.
I then tried the #17 insert (clear) on the 12mm, a horizontal line with an orange fluorescent pin 1.5mm ( I also bought a green pin). I liked having the horizontal line, never had that before. It seemed to show me if I was level. But I found the 1.5mm pin a little thick. After trimming the length down to 2cm it was a lot easier to use. Although I may trim it down to 1cm and try again. As at some angles you can see the long part of the pin in your eye line which I found off putting.
Finally I purchased the circular 5x pack for the 12mm tunnel. I used the 4.5mm inner. This I found strange as I am used to a pin. But I got used to it the more I shot at 70m as it framed the red ring at 70mm and I did get some nice groups. I don’t know how it would work when aiming off though. I suppose I am just more used to crosshairs because of video games. I need to try the other aperture sizes.
Beiter Sight Tunnel Instructions
Below is a link to a PDF of how to use the Beiter sight tunnel with instructions about how to change inserts and what insert is compatible with which version etc.
Beiter Sight Tunnel Instructions
Don’t forget to watch my video on the Beiter Sight Tunnel on my YouTube Channel
![]()